Recreate Childhood Bliss: Homemade Chocolate Covered Oatmeal Cookie Ice Cream Sandwiches (Snack and a Half Copycat)
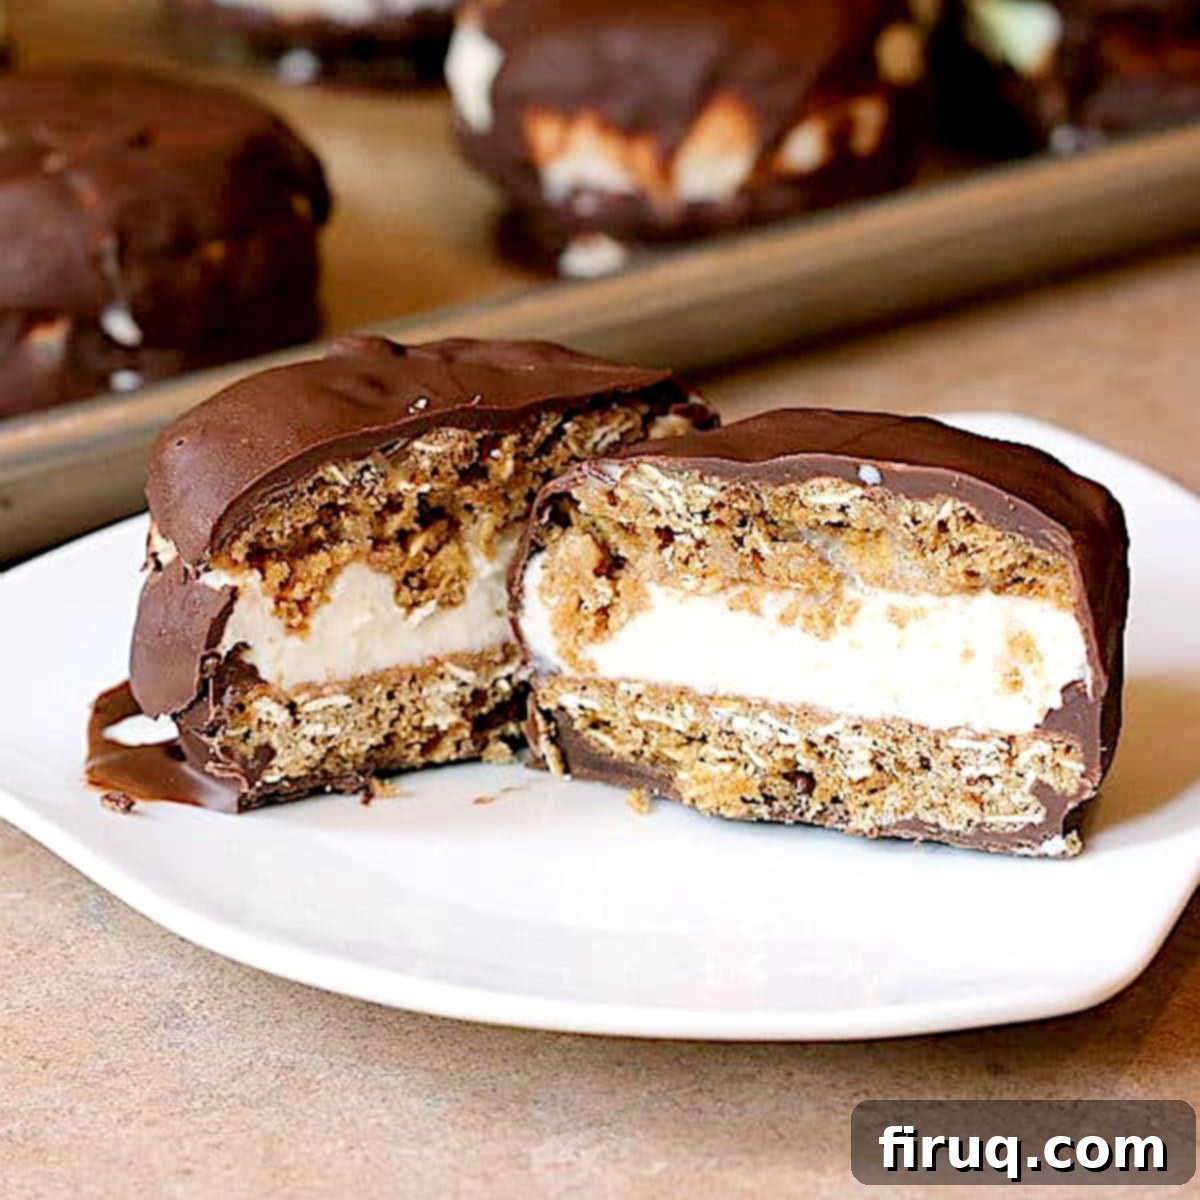
These Chocolate Covered Ice Cream Sandwiches, featuring chewy oatmeal cookies and a rich chocolate coating, are just like the beloved homemade Snack and a Half bars you remember from your childhood. Get ready to indulge in a wave of delicious nostalgia!
What Were Snack and a Half Bars? The Ultimate Nostalgic Ice Cream Treat
For many Canadians who grew up in the 80s and 90s, the name “Snack and a Half bars” evokes a sweet, cherished memory. These were not just any ice cream treat; they were individually packaged Chocolate Covered Ice Cream Sandwiches, distinguished by their soft, chewy oatmeal cookies and a decadent, snappy chocolate shell. They were a staple in corner stores and gas stations, a coveted reward, and my absolute favorite childhood indulgence.
I often wonder if these iconic treats were exclusive to Canada or if our friends in the U.S. also had the pleasure of enjoying them. All I know is that the small, local gas station near my childhood home always stocked them, and they were consistently my top choice whenever I earned a special treat. The unique combination of flavors and textures—the warmth of the oatmeal cookie, the chill of the vanilla ice cream, and the satisfying crack of the chocolate—was simply unbeatable.
As I entered my teenage years, these delightful bars seemed to vanish from shelves. However, a flicker of hope appeared when I spotted them once again in a tiny corner store during my time in Edmonton. I hesitantly passed on buying one, assuming they must be old stock. A recent dive into Google confirmed my suspicions: they had indeed been rebranded as “Super Snack” by Scotsburn Milk, but sadly, they were officially discontinued a few years ago. This discovery only fueled my desire to recreate this cherished childhood snack at home, and I’m thrilled to share my perfect copycat recipe with you.
Mastering Homemade Chocolate Covered Ice Cream Sandwiches
Whether you’re aiming to capture the essence of a bygone treat, just like I was, or simply want to create a fantastic homemade dessert, making your own chocolate covered ice cream sandwiches is an incredibly rewarding and delicious project. It’s surprisingly easy, though I must warn you, it can be a little messy – but that’s part of the fun of homemade treats!
The beauty of making these at home lies in the customization. You control the quality of the ingredients, the thickness of your cookies, and the richness of your chocolate coating. This allows for a truly personalized dessert that far surpasses any store-bought option.
Essential Ingredients for Your Chocolate Covered Ice Cream Sandwiches:
- Oatmeal Cookies: Your favorite recipe or high-quality store-bought. These are the heart of the sandwich!
- Vanilla Ice Cream or Frozen Yogurt: A classic choice for that authentic “Snack and a Half” flavor, but feel free to experiment.
- Semisweet Chocolate Chips or Melting Chocolate: The key to a perfect, snappy chocolate shell.
- Canola or Coconut Oil: Essential for thinning the chocolate and achieving a smooth, dip-friendly consistency.
Let’s dive deeper into selecting the perfect components for your ultimate ice cream sandwich experience:
Choosing the Right Oatmeal Cookies
I personally love baking my own oatmeal cookies from scratch, as it truly enhances the homemade feel and allows me to control the texture. However, don’t hesitate to use good quality store-bought cookies for convenience. The most crucial factor is choosing cookies that are the right size and thickness. Aim for cookies that are about 3 inches (7.5 cm) in diameter. This size is ideal for holding a generous scoop of ice cream without being too unwieldy to eat.
Thickness is also key. If your cookies are too thick, you’ll either struggle to get enough ice cream in the middle, or the resulting sandwich will be too large to comfortably bite into. My cookies were slightly on the thicker side this time, so for future batches, I’d recommend flattening them a bit more before baking to achieve that perfect cookie-to-ice-cream ratio. A softer, chewier cookie tends to work best, as it won’t crumble when you bite into the frozen treat.
Selecting Your Ice Cream
For an authentic “Snack and a Half” experience, vanilla ice cream is the way to go. Choose your absolute favorite brand, or for an even more rewarding experience, make your own! I often use my super easy No Cook Three Ingredient Vanilla Ice Cream, which delivers incredible flavor and creaminess with minimal effort. While vanilla is classic, feel free to get adventurous and use a different flavor that complements oatmeal cookies, such as caramel, butter pecan, or even a subtle coffee ice cream.
Before assembly, it’s vital to let your ice cream soften slightly on the counter. This makes it much easier to scoop and gently squish between the cookies without breaking them. You want it pliable, but not melted and soupy. About 10-15 minutes at room temperature should do the trick, depending on your environment.
Step-by-Step Assembly of Your Ice Cream Sandwiches:
The assembly process is straightforward, but a little care ensures a neat and delicious result:
- Scoop and Press: Take one of your softened oatmeal cookies. Place a generous scoop (or a few smaller scoops) of the slightly softened ice cream onto its flat bottom side.
- Top and Squish: Carefully place another oatmeal cookie on top, with its flat side facing the ice cream. Gently but firmly press down. You want to flatten the ice cream evenly to the edges without squeezing it all out.
- Clean Up: Use a small spatula, butter knife, or even your finger to clean up any excess ice cream that squishes out around the edges. This creates a clean, attractive sandwich.
- Initial Freeze: As you finish each sandwich, place it on a baking sheet lined with parchment paper or a non-stick baking mat. Once all your sandwiches are assembled, place the entire baking sheet into the freezer. Freeze them completely for at least 1-2 hours, or until they are rock solid. This crucial step prevents them from falling apart or melting too quickly when you dip them in chocolate.
The Chocolate Coating: Achieving the Perfect Shell
Once your ice cream sandwiches are thoroughly frozen, it’s time for the magical chocolate dip! This is what truly transforms them into the nostalgic “Snack and a Half” bars.
- Melt the Chocolate: In a small saucepan over medium-low heat (or in a microwave-safe bowl in 30-second intervals), gently melt your semisweet chocolate chips or melting chocolate with a tablespoon of canola or coconut oil. The oil is essential here; it thins out the chocolate, making it easier to dip and ensuring a smooth, even, and quicker-setting shell. Stir until completely smooth and glossy.
- Dip and Coat: Working quickly, take one frozen ice cream sandwich and dip it into the melted chocolate. You can completely submerge it or just dip the sides, depending on your preference. Allow any excess chocolate to drip off.
- Handle with Care: As you dip, the cold ice cream might cause the chocolate to seize up slightly, or the ice cream itself might soften a tiny bit. Don’t worry if they don’t look absolutely perfect on the first try; they will still taste absolutely amazing!
- Final Freeze: Immediately place the chocolate-covered sandwiches back onto the parchment-lined baking sheet. Return them to the freezer and freeze again until the chocolate shell is completely solid and firm. This usually takes another 30-60 minutes.
- Storage: Once fully frozen and the chocolate is hard, transfer your delicious homemade chocolate covered ice cream sandwiches to an airtight freezer bag or container. Store them in the freezer, ready for when a craving strikes! They’ll keep well for several weeks, if they last that long!
Customization and Variations for Your Homemade Ice Cream Sandwiches
While the classic oatmeal cookie and vanilla ice cream combination is divine, don’t hesitate to get creative with your homemade ice cream sandwiches. Here are a few ideas to inspire you:
- Cookie Swap: Experiment with different cookie bases! Chocolate chip cookies, peanut butter cookies, sugar cookies, or even gingerbread cookies can make unique and delicious sandwiches. Just ensure they are not too crumbly when frozen.
- Ice Cream Adventure: Beyond vanilla, try mint chocolate chip, strawberry, coffee, or a rich chocolate ice cream. Even fruit sorbets can offer a refreshing twist.
- Chocolate Variations: Use milk chocolate, white chocolate, or even a mix of dark and milk for your coating. You can also add a sprinkle of sea salt flakes to the wet chocolate for a gourmet touch.
- Fun Toppings: Before the chocolate sets, sprinkle on colorful sprinkles, finely chopped nuts (like pecans or walnuts), shredded coconut, or a drizzle of caramel sauce for extra flair.
- Dietary Considerations: For a gluten-free version, simply use your favorite gluten-free oatmeal cookies. Many brands offer delicious options now. You can also opt for dairy-free ice cream and chocolate if needed.
Want more delightful ice cream treats?
If you’ve loved making these nostalgic chocolate covered oatmeal cookie ice cream sandwiches, you’re in for a treat! Explore these other fantastic frozen dessert recipes that are perfect for any occasion, from simple gatherings to celebratory feasts. Each offers a unique way to enjoy the creamy, dreamy goodness of ice cream.

Chocolate Covered Ice Cream Sandwich Nutrition Notes:
It’s important to remember that the nutritional information for these delightful homemade ice cream sandwiches can vary significantly. Factors such as the specific type of oatmeal cookies you use (homemade vs. store-bought, and their specific ingredients), the brand and fat content of your vanilla ice cream or frozen yogurt, and the type of chocolate will all impact the final values.
The nutrition information provided in the recipe card below is an approximation. It’s calculated for one ice cream sandwich, assuming the use of homemade oatmeal cookies and a standard store-bought regular (not premium or light) vanilla ice cream. Please use this as a general guide.
For those with dietary restrictions, these chocolate covered oatmeal cookie ice cream sandwiches can be adapted to be gluten-free. Simply ensure that you use certified gluten-free oatmeal cookies. Additionally, if serving to someone with celiac disease or gluten sensitivity, double-check that they can tolerate oats, as some individuals are sensitive even to gluten-free oats.
Chocolate Covered Ice Cream Sandwiches

Print Recipe
Pin Recipe
Ingredients
- 12 of your favorite oatmeal cookies storebought or homemade; about 3″ across
- vanilla ice cream or frozen yogurt of your choice slightly softened
- 8 oz semisweet chocolate chips or melting chocolate
- 1 Tbsp canola or coconut oil
Instructions
-
Place one scoop of softened ice cream on the bottom of a cookie. Place a second cookie (bottom side in) on top of the ice cream and lightly press together. Smooth edges of ice cream with a cake spatula or butter knife. Repeat with remaining ice cream and cookies.
-
Place ice cream sandwiches on a baking sheet and freeze until completely solid, 1-2 hours.
-
Melt chocolate and oil together in a small saucepan over medium low heat. Quickly dip each ice cream sandwich into the melted chocolate to coat. Return chocolate coated ice cream sandwiches to a baking sheet lined with parchment or a non-stick baking mat and freeze until chocolate is solid.
-
Transfer ice cream sandwiches to an airtight container or zipper bag and store in the freezer until ready to use.
Nutrition
Notes
Tried this recipe?
Please Consider Leaving a Review!
