Homemade Oatmeal Maple Glazed Scones: A Wholesome & Delicious Recipe
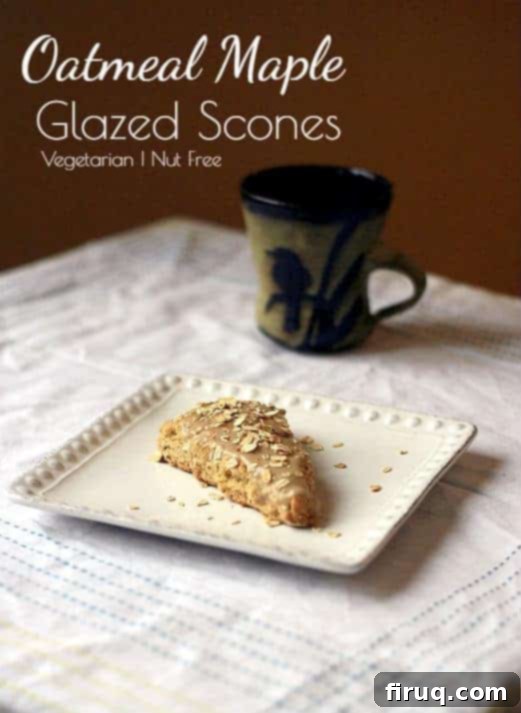
Forget the green dye this St. Patrick’s Day – or any day, for that matter! We’re diving into a more sophisticated, naturally sweet, and incredibly satisfying treat: Oatmeal Maple Glazed Scones. While scones are a beloved staple in Ireland, England, and their country of origin, Scotland, this particular recipe offers a delightful twist. We’ve packed them with hearty oatmeal and drizzled them with a sweet maple glaze, creating a flavor profile that’s both comforting and elegantly simple.
Many traditional scone recipes call for an entire pound of butter, which, while delicious, isn’t always practical for an everyday, health-conscious breakfast or snack. That’s why I’ve thoughtfully adjusted this recipe to deliver all the flaky, tender goodness you expect from a scone, but with a lighter touch. The result is a more wholesome and equally scrumptious scone you can enjoy guilt-free, any time of year.
Why You’ll Love These Oatmeal Maple Glazed Scones
These scones aren’t just a treat; they’re a celebration of natural flavors and simple baking. Here’s why this recipe will quickly become a favorite in your home:
- Rich, Nutty Flavor: By toasting the oats before adding them to the dough, we unlock a deeper, nuttier flavor that elevates the entire scone experience. It’s a small step that makes a big difference!
- Perfect Sweetness: The maple syrup in both the dough and the glaze provides a natural, comforting sweetness that isn’t overwhelming. It perfectly complements the wholesome oats without being overly sugary.
- Wholesome Ingredients: With a blend of whole wheat and all-purpose flour, and the option to use Greek yogurt or sourdough starter, these scones offer a more nutritious profile than many conventional recipes.
- Flaky & Tender Texture: Despite using less butter, our method ensures these scones are incredibly tender on the inside with a perfectly golden, slightly crisp exterior.
- Versatile Treat: Ideal for a cozy breakfast, a delightful brunch addition, an afternoon tea snack, or even a simple dessert. They pair wonderfully with a cup of coffee or tea.
Crafting Your Irish Oatmeal Maple Glazed Scones: A Step-by-Step Guide
Making these delicious scones is a straightforward process, but a few key steps ensure perfection every time. Let’s walk through it.
1. The Secret to Deeper Flavor: Toasting the Oats
The first step, and one that truly sets this recipe apart, is toasting the oats. This simple technique enhances their natural flavor, adding a warm, nutty depth that permeates the entire scone. You can do this easily in your oven. Just spread the old-fashioned rolled oats evenly on a baking sheet and toast them until they’re fragrant and lightly golden. Keep a close eye on them, as they can burn quickly. This extra effort is well worth it for the incredible aroma and taste it imparts to the finished product. My trusty multicooker can even do this for me, but an oven works perfectly!
2. Assembling the Dry Ingredients & Butter
Next, we combine the dry ingredients: whole wheat flour, all-purpose flour, baking powder, baking soda, and salt. The whole wheat flour adds a pleasant chewiness and a boost of fiber, while the all-purpose flour keeps the scones tender. Baking powder and baking soda are essential leavening agents that give the scones their characteristic rise and lightness. Mix these in your food processor for quick and easy blending.
Then, it’s time to incorporate the cold, unsalted butter. The key here is to ensure the butter is very cold and cut into small pieces. Pulsing it into the flour mixture until it resembles coarse sand or small peas creates pockets of butter that melt during baking, resulting in those desirable flaky layers. This process is crucial for achieving that perfect scone texture. After the butter is incorporated, gently mix in your toasted oats.
3. Adding Wet Ingredients and Forming the Dough
In a separate bowl, whisk together the wet ingredients: sourdough starter discard (or Greek yogurt), milk, and maple syrup. The sourdough discard or Greek yogurt adds a lovely tang and moisture to the scones, contributing to their tender crumb. If using sourdough discard, it won’t provide the leavening here, but rather a depth of flavor. Pour this mixture into the food processor with your dry ingredients and pulse just until a cohesive dough forms. It’s vital not to overmix the dough, as this can develop the gluten too much, leading to tough scones. A few quick pulses are usually all it takes.
4. Shaping and Baking Your Scones
Once your dough is ready, turn it out onto a lightly floured or oat-dusted work surface. Gently form the dough into a round disc, about 1 inch thick. I prefer to cut my scones into wedges, similar to how a pie is cut. This method is incredibly efficient as it minimizes dough waste and re-rolling, which can make scones tough. Arrange the wedges on a parchment-lined baking sheet, ensuring a little space between each for even baking. Bake them until they are golden brown and cooked through, usually around 12-16 minutes. The exact time can vary depending on your oven, so keep an eye on them!
5. The Delightful Maple Glaze
While your oatmeal maple scones are baking to perfection, you can prepare the simple yet irresistible maple glaze. This involves whisking together maple syrup and powdered sugar. The beauty of this glaze is its adjustability: add more powdered sugar for a thicker, sweeter glaze, or a touch more maple syrup if you prefer a thinner consistency. It’s truly a matter of personal preference!
6. Glazing and Serving
Once the scones emerge from the oven, resist the urge to glaze them immediately. It’s crucial to let them cool for at least 5-10 minutes. If you glaze them while they’re too hot, the glaze will simply melt and run off, rather than setting beautifully. After a brief cooling period, drizzle the luscious maple glaze generously over each scone. For an extra touch of texture and visual appeal, sprinkle some of your leftover toasted oats on top. Now comes the best part: you can either let the glaze harden slightly for a neater bite or, if you’re like me and can’t wait, enjoy them right away while they’re still warm and the glaze is wonderfully gooey. Pure yum! Just remember, if you plan to store them, let the glaze set completely before placing them in an airtight container. They also freeze exceptionally well, making them perfect for meal prep.
Key Ingredients for Irish Oatmeal Maple Glazed Scones
Here’s a breakdown of the essential components that bring these delicious scones to life:
- Old Fashioned Rolled Oats: The star of our scones! These provide texture, flavor, and a wholesome earthiness. Avoid instant or steel-cut oats, as they won’t yield the same results.
- Whole Wheat Flour: Adds a nutty flavor, a denser crumb, and beneficial fiber. Feel free to substitute with more all-purpose flour if you prefer a lighter texture.
- All-Purpose Flour: Provides the structural base for the scones, ensuring a tender and palatable texture.
- Baking Powder & Baking Soda: These leavening agents are crucial for giving the scones their characteristic lift and airy texture.
- Salt: Balances the sweetness and enhances all the other flavors in the scone.
- Unsalted Butter: Must be very cold and cut into small pieces. It’s responsible for the flakiness of the scones as it creates steam pockets during baking.
- Sourdough Starter Discard or Greek Yogurt: This is a secret weapon for moisture and a subtle tang. If using Greek yogurt, plain or vanilla flavored works best. This adds tenderness without a lot of extra fat.
- Milk: Helps to bring the dough together and adds richness. Any milk (dairy or non-dairy) can work, but whole milk will yield a richer scone.
- Maple Syrup (for dough): Infuses the scone dough with its distinctive, warm sweetness.
- Maple Syrup (for glaze): Forms the base of our simple, yet incredibly flavorful glaze.
- Powdered Sugar: Combines with maple syrup to create the drizzle-able glaze, allowing you to adjust thickness and sweetness.
Tips for Perfect Scones Every Time
- Keep Ingredients Cold: Cold butter and cold wet ingredients are essential for flaky scones. Warm butter melts too quickly and won’t create those desirable pockets of steam.
- Don’t Overmix: Overworking the dough develops gluten, leading to tough scones. Mix just until combined.
- Gentle Handling: When forming and cutting the dough, handle it as little as possible. The less you work it, the more tender your scones will be.
- Even Thickness: Ensure your dough is of even thickness when shaping the round for consistent baking.
- Preheat Your Oven Properly: A hot oven ensures a quick rise, helping the scones achieve their height and light texture.
- Parchment Paper is Your Friend: Lining your baking sheet prevents sticking and makes cleanup a breeze.
- Cool Before Glazing: Patience is key here! A cooled scone will allow the glaze to set beautifully without melting into a sugary puddle.
Want More Delicious Biscuit and Scone Recipes?
If you’ve fallen in love with these oatmeal maple glazed scones, you’ll be thrilled to explore more of our delightful baked goods. Scones and biscuits are wonderfully versatile, offering a comforting treat for any occasion. Here are a few more recipes to inspire your baking adventures:
Irish Oatmeal Maple Glazed Scones Nutrition Notes:
The nutrition information provided in the recipe card below is calculated using low-fat plain Greek yogurt and 1% milk. Please keep in mind that substituting with different types of yogurt or milk (e.g., full-fat Greek yogurt, whole milk, or a non-dairy alternative) will slightly alter the nutritional values. These scones are a delicious treat, but as with any baked good, moderation is key. They are a bit higher in calories and saturated fat to be an everyday snack, making them perfect for an occasional indulgence or a special breakfast.
Irish Oatmeal Maple Glazed Scones

Print Recipe
Pin Recipe
Ingredients
- 1 1/2 cups old fashioned rolled oats see note
- 1/2 cup whole wheat flour
- 1/2 cup all-purpose flour
- 1 1/2 teaspoons baking powder
- 1/2 teaspoon baking soda
- 1/2 teaspoon salt
- 1 stick unsalted butter cut into 8 pieces
- 1 cup Greek yogurt (plain or vanilla flavored) or sourdough starter discard
- 1/3 cup milk
- 1/3 cup maple syrup
- 1/3 cup maple syrup
- 1/3 cup powdered sugar
Instructions
-
Heat oven to 350°F. Spread oats onto a baking sheet. Toast oats until fragrant and just lightly browned, about 10 minutes. This enhances their nutty flavor.
-
Increase oven temperature to 400°F. Line a baking sheet with parchment paper. Add whole wheat flour, all-purpose flour, salt, baking powder, and baking soda to a food processor and pulse to combine evenly. Add the very cold, cubed butter and pulse until the mixture resembles dry sand with some pea-sized pieces. Incorporate the toasted oats.
-
In a separate bowl, whisk sourdough starter (or Greek yogurt), milk, and maple syrup together until well combined. Pour this wet mixture into the food processor and pulse just until a dough is formed. Be careful not to over-process the dough to ensure tender scones.
-
Remove the dough from the food processor and gently place it onto a lightly floured or oat-sprinkled work surface. Form the dough into a round disc, roughly 1 inch thick. Using a sharp knife or bench scraper, cut the dough into 8 equal wedges, like a pie. Place the wedges on the prepared baking sheet, leaving a small space between each scone. Bake for 12-16 minutes, or until golden brown and cooked through.
-
While the scones are baking and cooling, whisk the powdered sugar into the maple syrup until smooth. If you desire a thicker glaze, gradually add more powdered sugar. For a thinner glaze, add a tiny bit more maple syrup or milk. Allow the baked scones to cool on a wire rack for 5-10 minutes before glazing. Drizzle the maple glaze generously over the warm scones. For extra flair and texture, sprinkle with some reserved toasted oats, if desired. Serve immediately, or let the glaze set before storing.
Nutrition
Notes
If you don’t have sourdough starter, you can easily replace it with an equal amount of sour cream or Greek yogurt (plain or vanilla flavored) for similar moisture and tang.
Tried this recipe?
Please Consider Leaving a Review!

Storage and Freezing Tips
These Oatmeal Maple Glazed Scones are best enjoyed fresh, but they also store well, making them ideal for prepping ahead or enjoying over a few days.
- Room Temperature: Once the glaze has fully set, store cooled scones in an airtight container at room temperature for up to 2-3 days.
- Refrigeration: If you need to store them longer, or if your kitchen is particularly warm, you can refrigerate them in an airtight container for up to 5 days. Reheat gently in the microwave or oven for best results.
- Freezing Baked Scones: These scones freeze beautifully! Once cooled completely and the glaze has set, place them in a single layer on a baking sheet and freeze until solid. Then, transfer them to a freezer-safe bag or container. They will keep for up to 2-3 months. Thaw at room temperature or reheat directly from frozen in a moderate oven until warmed through.
- Freezing Unbaked Scones: You can also prepare the dough, cut the wedges, and freeze them unbaked. Place the raw wedges on a parchment-lined baking sheet and freeze until solid, then transfer to a freezer-safe bag. When ready to bake, place frozen scones on a prepared baking sheet and bake for a few extra minutes (typically 18-22 minutes) until golden brown. This is a fantastic way to have fresh scones on demand!
Conclusion: Your New Favorite Scone Recipe
These Oatmeal Maple Glazed Scones are more than just a recipe; they’re an invitation to savor simple, wholesome goodness. With the rich, nutty flavor of toasted oats and the comforting sweetness of maple syrup, they offer a delightful experience that’s perfect for any time of day. Whether you’re enjoying them for a special breakfast, a cozy afternoon treat, or a lighter alternative to traditional baked goods, their tender crumb and irresistible glaze are sure to impress. So, gather your ingredients, follow these easy steps, and treat yourself and your loved ones to a batch of these truly delicious homemade scones. Happy baking!
